In Step 2, you see the home page of the site. Now login to the site with your usual login and password.
Tip: If you just want to bookmark a page, you can skip the login part.
When you have logged in, you should see your secured/private area... in this case my email start page.
Tip: As soon as you login and the page finishes downloading, you click on Next. Make sure you don't click any other links before clicking on Next.

You give the bookmark a name here, and click Finish.
If you have a Basic Authentication application, you can provide the login/password here... you can find out if you are logging in through Basic Authentication if the login/password is asked in a new popup window, launched automatically by the browser. More Help...
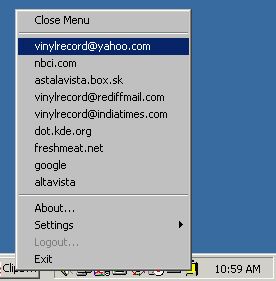
This is the menu which appears when you right-click on the icon in the taskbar. You can see all your bookmarks/web-sites here. Clicking on any one of them will log you in automatically and take you directly to you secured start page.
Tip: A new browser window will be launched everytime, so you can open multiple windows at the same time.
This is the Edit Bookmarks page, where you can change the information Autoform send to the web sites.
You can check on different fields here, which will be prompted when the bookmark is launched.
e.g. In this screenshot if you check the 'login' and 'passwd' fields in the 'Prompt' column and click on Save, and launch the bookmark again, it will prompt for the login and password automatically. Now you can login as different users to the same website. See next screenshot.
Tip: You can change a value by selecting the cell, and pressing F2.
This shows Autoform prompting for values. You can configure Autoform to prompt for any values for any site, even search engines.
Read Example.txt after installation for an example of how to create a personal search engine using this feature.
Profiles:
You can setup different usernames and passwords, each with their own bookmarks. Using profiles isolates the bookmarks of different users. This is usually ideal for home usage.
Recommended for Windows 95, 98 and Windows ME.
Integrated Authentication:
Integrated Authentication ties up with the Windows user login (usually to a domain), and uses that to authenticate the user. A seperate login and password is not required in this case. A user logging-in with a different username to Windows, _cannot_ see your bookmarks.
This is especially useful if you're on a corporate network, and you have to login with your personal userid to your machine anyway. If you need additional security when you are away from your desk, use any screensaver with a password.
Recommended for Windows NT and Windows 2000 on a network.